Publish your SDKs
Once you are satisfied with your SDK, you can distribute it to end users by publishing it to a package registry, like npm, PyPI, or RubyGems. After publishing, generated SDK code goes to a GitHub repo you own, where it's picked up by package registries.
The Stainless-managed release flow handles the versioning and changelogs expected in a quality SDK. You can even automate this process so changes to your OpenAPI spec trigger new releases.
Link production repos
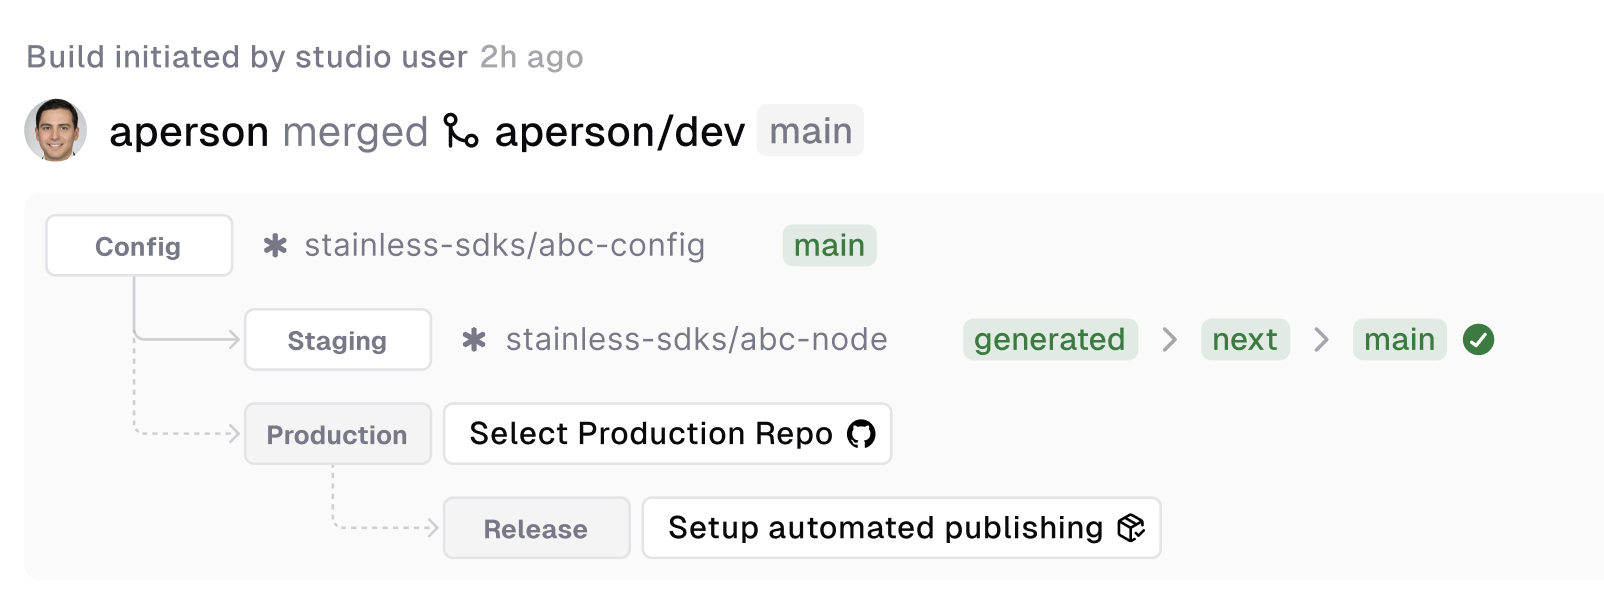
Before you publish an SDK, we push the generated code in a staging repo
under the stainless-sdks GitHub organization. When your SDK is published, we
instead push the generated SDK code to a GitHub repo you own, called the
production repo.
Install the Stainless GitHub app
If your Stainless organization does not already have the Stainless GitHub app installed, you'll need to install it first.
- In the Stainless dashboard, navigate to your project.
- Navigate to Release > Production repos.
- Follow the installation flow. When prompted, select which repos the Stainless GitHub app can access.
- Once repos have been selected and permissions have been reviewed, click Install & Authorize.
By default All repositories is selected, but we recommend you only select the repos you plan to use for Stainless SDKs.

Choose a production repo
After installing the Stainless GitHub app, you can then choose or create the production repo for each SDK.
We recommend choosing a name that meaningfully identifies your SDK. For
example, <company-name>-python is a common choice for Python SDKs.
The repo can be public or private.
- In the Stainless dashboard, navigate to your project.
- Navigate to Release > Production repos.
- If the Stainless GitHub app is installed, you will see a list of languages for your project. For each SDK you want to publish, use the dropdown to choose or create its production repo.
- Optionally, configure which branch of the production repo to push code to, by selecting it from the dropdown next to the repo name.
You need a choose a different GitHub repo for each language: one for TypeScript, one for Python, and so on.
The production repo for a Terraform provider must be in the form terraform-provider-<name>.
Connect package registries
Package registries make your packages readily available to your users. After a one-time setup, Stainless can publish code pushed to your production repo.
Node/TypeScript: npm
Get an access token
- Log in or sign up at npm.
- Select your profile picture on the top right to open a dropdown.
- Navigate to Access Tokens > Generate New Token.
- Choose a token version:
- Granular Access Token, recommended if you’re publishing the SDK under a scope (for example,
@<company-name>/sdk) - Classic Token, required if not publishing under a scope
- Granular Access Token, recommended if you’re publishing the SDK under a scope (for example,
- If creating a Classic Token, ensure you have selected Automation as the token type. Apart from that, the token settings you choose are up to you.
Add the token to your production repo
- In the production repo, navigate to Secrets and variables > Actions > New repository secret.
The URL should look like
https://github.com/<org>/<repo>/settings/secrets/actions/new. - Add a new secret named
NPM_TOKENwith your API token.
Choose a package name and update your Stainless config
-
Choose an available package name. Suggested names are:
<company-name>@<company-name>/sdk(This requires you have the right npm organization.)
You can check if the name is available.
-
Update the Stainless config with your package name and save.
targets:
  node:
    package_name: <package-name>
    publish:
      npm: true
Deno: JSR
Create a JSR package
- Log in or sign up at JSR.
- Select Publish a package.
- Choose an appropriate scope and package name.
- Select Create.
(Option 1) Publish with GitHub OIDC
-
In JSR, navigate to <package-name> > Settings > GitHub Repository.
-
Link the production repo to the JSR package you created.
-
Navigate to your <scope-name> > Settings > GitHub Actions security.
-
Select Do not restrict publishing. This will let the Stainless GitHub App publish even though it is not a member of your scope.
-
Update the Stainless config with your package name and save.
targets:
  node:
    publish:
      jsr:
        package_name: @<scope-name>/<package-name>
(Option 2) Use access token to publish
-
In JSR, navigate to Account > Tokens > Personal access tokens > Create new token.
-
Navigate through wizard to get your token:
- Publish packages
- A development machine
- Create a token
- Create a token for the package name.
-
In your production repo, navigate to Secrets and variables > Actions > New repository secret. The URL should look like
https://github.com/<org>/<repo>/settings/secrets/actions/new. -
Add a new secret named
JSR_TOKENwith your API token. -
Update the Stainless config with your package name and
use_access_token, and save.node:
package_name: <package-name>
publish:
npm: true
jsr:
package_name: @<scope-name>/<package-name>
use_access_token: true
Python: PyPI
Get an API token
- Log in or sign up at PyPI.
- Select your profile picture on the top right to open a dropdown.
- Navigate to Access settings > API tokens > Add API token. You may have to verify your email address and set up 2FA if you haven't already done so.
Add the token to your production repo
- In your production repo, navigate to Secrets and variables > Actions > New repository secret.
The URL should look like
https://github.com/<org>/<repo>/settings/secrets/actions/new. - Add a new secret named
PYPI_TOKENwith your API token.
Choose a package name and update your Stainless config
-
Choose an available package name. Suggested names are:
<company-name><company-name>-client
You can check whether the name is available by testing the link at
https://pypi.org/project/<package-name>. -
Update the Stainless config with your package name and save.
targets:
  python:
    package_name: <package-name>
    publish:
      pypi: true
Go: GitHub
Go installs packages from source, so nothing other than the GitHub repository is required for setup. We automatically request updates from the Go package index which updates your godoc on a release.
Java/Kotlin: Sonatype Maven Central
We publish JVM packages to Sonatype. Sonatype has both a legacy (OSSRH) publishing flow and a new Central Portal publishing flow.
If you do not already publish to OSSRH, you will most likely have to use the new Central Portal publishing flow. If you are already publishing to OSSRH, you can continue to do so.
Setting up Sonatype can be an involved process. We recommend you go through this process after getting your SDKs into a satisfactory state.
Update your Stainless config (Central Portal only)
For backwards compatibility, the default sonatype_platform is ossrh. If you are using the Central Portal, you need to update the Stainless config to portal:
targets:
  java:
    reverse_domain: com.example.api
    publish:
      maven:
        sonatype_platform: portal
Add namespace (Central Portal only)
-
Add a namespace on Sonatype Portal
The namespace will be part of your package's name. It will be the inverse of the domain that you own. i.e.
tld.domain.subdomain -
Copy the Verification Key
You will be able to prove your ownership of the namespace by adding a TXT record of the verification key to your domain.
Prove ownership over your domain
Add a temporary TXT record to the DNS for your primary domain (the reverse of your groupId) to verify that the person registering this Java group actually controls the domain.
If using the Central Portal flow, the contents of the TXT record is the verification key provided by Sonatype.
If using the OSSRH flow, the contents of the TXT record is the ID of the JIRA ticket created in the previous step (for example, OSSRH-12345).
Generate user token (Central Portal only)
From the Sonatype dashboard, generate a user token XML file.
Extract <username>…</username> and <password>…</password> from the XML file and store them somewhere secure.
<server>
	<id>${server}</id>
	<username>//P7KNy5</username>
	<password>+8sEiCiUrSoODM/S4yFhiKqUWJzS1lDbcac5I7hVzPS4</password>
</server>
Generate a PGP key
-
Install GnuPG.
-
In a terminal, run
gpg --gen-key. Enter your name, email, and a passphrase for the keypair. -
Run
gpg --list-keys --keyid-format short:% gpg --list-keys --keyid-format short
[keyboxd]
---------
pub ed25519/7FAD9FAA 2023-08-02 [SC] [expires: 2026-08-01]
418D41921938A753CAAE57985114AD037FAD9FAA
uid [ultimate] Your Organization <you@yourorg.com>
sub cv25519/07EB38A7 2023-08-02 [E] [expires: 2026-08-01] -
Export the key in ASCII-armored format. In the above example, the short key ID is
7FAD9FAA.$ gpg --export-secret-keys --armor 7FAD9FAA
-----BEGIN PGP PRIVATE KEY BLOCK-----
lIYEZMpnEhYJKwYBBAHaRw8BAQdA1FQMKz+wwliKNdLehegZP0QiaKrZJqADNyVn
VCUzIrD+BwMCwZrqVbVPfSr8NwxEh3M6kWtMGmnLMOk/NWVe7dtCxDxo37l/Ncxj
Mm9EZiH6WXwoXXq20nOW354oNOVz/UPvDU+oaRDDUM9SYs392i69WLQjWW91ciBP
cmdhbml6YXRpb24gPHlvdUB5b3Vyb3JnLmNvbT6ImQQTFgoAQRYhBEGNQZIZOKdT
yq5XmFEUrQN/rZ+qBQJkymcSAhsDBQkFo5qABQsJCAcCAiICBhUKCQgLAgQWAgMB
Ah4HAheAAAoJEFEUrQN/rZ+qgtsBAMCBuTqYEJljxStRO7SsMLWOc47CIIXD0Yid
CbySBX0ZAP9DXuuGVYbHFONvHxNKszu2hY9A1BbRuNjeGeWuVOw9ApyLBGTKZxIS
CisGAQQBl1UBBQEBB0AFxkZ+ZdEN7Epwri/w5ETAf+MOqdwAP2sS6TccSjEiXQMB
CAf+BwMCtKG1TBUSC/z8tn761I5j+ifVIuMqdQPYIhZtjvIyC+NyrBi0j1ZtUG4A
DAeDKNyM63uyb7omOH8+Lu0J71SGhVnZWszUOf3rrT/TA5MktYh+BBgWCgAmFiEE
QY1Bkhk4p1PKrleYURStA3+tn6oFAmTKZxICGwwFCQWjmoAACgkQURStA3+tn6qa
XAD/W2ucVURngmCUiUtdjQAZz36yQYPQmBhcdabZMyXKHz0A/itwYkuRbD2mp4p/
xJk/QLXs/2/xBA6s0ROVVspy6MEA
=p/g/
-----END PGP PRIVATE KEY BLOCK----- -
Publish your PGP public key.
$ gpg --keyserver keyserver.ubuntu.com --send-keys 7FAD9FAAIf you get the following error:
gpg: sending key XXXXXX to hkp://keyserver.ubuntu.com
gpg: keyserver send failed: No route to host
then your computer might be trying to use IPv6 and failing. Run the following to get keyserver.ubuntu.com's IPv4 addresses:
$ host keyserver.ubuntu.com
keyserver.ubuntu.com has address XXX.XXX.XXX.XX
keyserver.ubuntu.com has address XXX.XXX.XXX.XX
keyserver.ubuntu.com has IPv6 address XXXX:XX:XXXX:XXXX::XXX
keyserver.ubuntu.com has IPv6 address XXXX:XX:XXXX:XXXX::XXX
Then rerun the
gpgcommand with one of the IPv4 addresses:$ gpg --keyserver XXX.XXX.XXX.XX --send-keys 7FAD9FAA
Add secrets to your production repo
- In the production repo, navigate to Secrets and variables > Actions > New repository secret.
The URL should look like
https://github.com/<org>/<repo>/settings/secrets/actions/new. - Add the following secrets:
-
{ORG_NAME}_SONATYPE_GPG_SIGNING_KEY: your PGP private key. It should be the entire output ofgpg --export-secret-keys --armor <keyid>. -
{ORG_NAME}_SONATYPE_GPG_SIGNING_PASSWORD: the passphrase you entered when creating the keypair. -
{ORG_NAME}_SONATYPE_USERNAME: username for your Sonatype account. -
{ORG_NAME}_SONATYPE_PASSWORD: password for your Sonatype account (OSSRH) or your Sonatype user token (Central Portal).
Ruby: RubyGems
Get an API token
- Log in or sign up at RubyGems.
- Select your profile picture on the top right to open a dropdown.
- Navigate to Settings > API keys.
- Create a new API key with the "Push rubygems" privilege. Make sure MFA is disabled.
Add the token to your production repo
- In your production repo, navigate to Secrets and variables > Actions > New repository secret.
The URL should look like
https://github.com/<org>/<repo>/settings/secrets/actions/new. - Add a new secret named
GEM_HOST_API_KEYwith your API token.
Choose a package name and update your Stainless config
-
Choose an available package name. Suggested names are:
<company-name><company-name>-client
You can check whether the name is available by testing the link at
https://rubygems.org/gems/<package-name>. -
Update the Stainless config with your package name and save.
targets:
  ruby:
    gem_name: <package-name>
    publish:
      rubygems: true
Terraform: Terraform Registry
The following steps allow you to publish your provider to the registry. If you have more custom requirements, you can also refer to the official HashiCorp publishing documentation.
Connect Terraform Registry to your production repo
- Log in or sign up at the Terraform Registry.
- Select
Publish Provider. - Follow the instructions to install the Hashicorp GitHub App.
- In the provider publishing page, select the connected user / organization.
- Select your production repo and follow the instructions to install the webhooks required to publish the provider.
Generate a PGP key
-
Install GnuPG.
-
In a terminal, run
gpg --gen-key. Enter your name, email, and a passphrase for the keypair. -
Run
gpg --list-keys --keyid-format short:% gpg --list-keys --keyid-format short
[keyboxd]
---------
pub ed25519/7FAD9FAA 2023-08-02 [SC] [expires: 2026-08-01]
418D41921938A753CAAE57985114AD037FAD9FAA
uid [ultimate] Your Organization <you@yourorg.com>
sub cv25519/07EB38A7 2023-08-02 [E] [expires: 2026-08-01] -
Export the key in ASCII-armored format. In the above example, the short key ID is
7FAD9FAA.$ gpg --export-secret-keys --armor 7FAD9FAA
-----BEGIN PGP PRIVATE KEY BLOCK-----
lIYEZMpnEhYJKwYBBAHaRw8BAQdA1FQMKz+wwliKNdLehegZP0QiaKrZJqADNyVn
VCUzIrD+BwMCwZrqVbVPfSr8NwxEh3M6kWtMGmnLMOk/NWVe7dtCxDxo37l/Ncxj
Mm9EZiH6WXwoXXq20nOW354oNOVz/UPvDU+oaRDDUM9SYs392i69WLQjWW91ciBP
cmdhbml6YXRpb24gPHlvdUB5b3Vyb3JnLmNvbT6ImQQTFgoAQRYhBEGNQZIZOKdT
yq5XmFEUrQN/rZ+qBQJkymcSAhsDBQkFo5qABQsJCAcCAiICBhUKCQgLAgQWAgMB
Ah4HAheAAAoJEFEUrQN/rZ+qgtsBAMCBuTqYEJljxStRO7SsMLWOc47CIIXD0Yid
CbySBX0ZAP9DXuuGVYbHFONvHxNKszu2hY9A1BbRuNjeGeWuVOw9ApyLBGTKZxIS
CisGAQQBl1UBBQEBB0AFxkZ+ZdEN7Epwri/w5ETAf+MOqdwAP2sS6TccSjEiXQMB
CAf+BwMCtKG1TBUSC/z8tn761I5j+ifVIuMqdQPYIhZtjvIyC+NyrBi0j1ZtUG4A
DAeDKNyM63uyb7omOH8+Lu0J71SGhVnZWszUOf3rrT/TA5MktYh+BBgWCgAmFiEE
QY1Bkhk4p1PKrleYURStA3+tn6oFAmTKZxICGwwFCQWjmoAACgkQURStA3+tn6qa
XAD/W2ucVURngmCUiUtdjQAZz36yQYPQmBhcdabZMyXKHz0A/itwYkuRbD2mp4p/
xJk/QLXs/2/xBA6s0ROVVspy6MEA
=p/g/
-----END PGP PRIVATE KEY BLOCK----- -
Publish your PGP public key.
$ gpg --keyserver keyserver.ubuntu.com --send-keys 7FAD9FAAIf you get the following error:
gpg: sending key XXXXXX to hkp://keyserver.ubuntu.com
gpg: keyserver send failed: No route to host
then your computer might be trying to use IPv6 and failing. Run the following to get keyserver.ubuntu.com's IPv4 addresses:
$ host keyserver.ubuntu.com
keyserver.ubuntu.com has address XXX.XXX.XXX.XX
keyserver.ubuntu.com has address XXX.XXX.XXX.XX
keyserver.ubuntu.com has IPv6 address XXXX:XX:XXXX:XXXX::XXX
keyserver.ubuntu.com has IPv6 address XXXX:XX:XXXX:XXXX::XXX
Then rerun the
gpgcommand with one of the IPv4 addresses:$ gpg --keyserver XXX.XXX.XXX.XX --send-keys 7FAD9FAA
Add secrets to your production repo
- In the production repo, navigate to Secrets and variables > Actions > New repository secret.
The URL should look like
https://github.com/<org>/<repo>/settings/secrets/actions/new. - Add the following secrets:
-
GPG_SIGNING_KEY: your PGP private key. It should be the entire output ofgpg --export-secret-keys --armor <keyid>. -
GPG_SIGNING_PASSWORD: the passphrase you entered when creating the keypair.
Update your Stainless config
-
Update the Stainless config and save.
targets:
  terraform:
    publish:
      hashicorp_registry: true
Merge your release PR and see it appear in the Registry
- Merge your release PR when you're ready. This should then create a tag, use goreleaser to build artifacts, and attach it to the release. Hashicorp will then import the release into their registry. You might need to wait a few minutes for it to show up on your provider page.
Versioning and releases
Whenever we generate a new change for your SDK, we create and merge a PR into the next branch in your
production repository. Each commit should describe the related change using the Conventional
Commits format.
A Release PR is then created against the main branch, which collects individual changes until you are
ready to release them. The PR waits for a code owner's review and merges automatically upon approval.
The Release PR aggregates changes due to both your API spec changes and changes to Stainless' codegen engine. Each granular change is added as a separate commit, which you can review individually.
Your first release will be Release 0.1.0-alpha.1, meaning that the first release published to your package
manager will have an alpha tag.
Stainless will increment the version used in each subsequent release PR based on the prior one. We use the semantic information of the commits in the release to find the next available version. We highly recommend using Conventional Commits to ensure versioning is correct and automatic:
- Breaking changes increment the major version number (if and only if the version is already at least
1.0.0) - Features increment the minor version number
- Fixes increment the patch number
You can override our suggested version by modifying the PR title. Doing so will propagate your provided version (including any alpha or beta tags) to the release in Github and your package manager. We recommend:
- Staying in the alpha or beta stage while your SDKs still have diagnostic errors
- Staying in the 0.0.x range while your SDKs still have diagnostic warnings
- Staying in the 0.x.y range while your SDKs still have unacknowledged diagnostic notes
- Moving to 1.0.0 once your SDK has none of the above
We use semver-valid version numbers for releases.
Development and release flow
Stainless pushes code to various GitHub repos:
- Stainless config repo
- Stainless SDK repos
- Your production repos
Release flow
Stainless uses a few branches in your production repository to manage the release process:
main/master: The target branch of your repository. This defaults tomainbut can be configured per language usingproduction_repo.next: This branch is used to collect changes for the next release. Stainless will create Release PRs based on the changes in this branch.generated: The branch where Stainless pushes generated code from the Studio. This branch represents the latest generated code before any custom code changes are applied.release-please--*: Temporary release branches created and managed by our GitHub App. These branches are based onnextand are used to create release PRs.